How to effortlessly play vibrato on violin
Vibrato basics
Vibrato improves our playing and makes it mature and colorful. Vibrato has thousands of colors, and indeed, it is very personal and individual for every violin player. It can be very delicate and tricky to study since it requires us to prepare our technique and be consistent in practicing it.
Many students are eager to do vibrato on violin and start shaking their hands right away in the hope to sound like their teachers or famous violinists. Often times they produce a combination of shaky and faulty movements that involve excessive tension and uneven speed. Please do not do that. In a healthy vibrato, all parts of the left hand are involved. This is why it is incorrect to think about vibrato as a shaky thing. It is a long-term process of training your muscles and acquiring a new habit that with time will allow you to play with vibrato effortlessly. Vibrato is not an easy skill to master; it cannot be polished in one day or even a week.
Instead, it takes effort, consistency, and patience to refine this violin technique and bring it up to the next professional level. But don’t get frustrated; with correct exercises, guidance, patience, and persistence, you can achieve the first noticeable signs of improvement much sooner, possibly within a week or two.
Fundamentals and pre-requisites for vibrato.
As I said earlier, vibrato on violin is a delicate technique. There are a handful of so-called prerequisites for starting to learn vibrato. Since it involves a complex of muscles and all parts of our left hand, a solid understanding of left-hand motion, intonation, positions, etc., I usually ask my students the following questions to figure out if they feel they are ready for it:
Following questions include:
- Are you familiar with the first position and know all the notes?
- Are you familiar with the third position?
- Do you know how to shift?
- Do you have any ongoing issues with the left hand, such as tension or holding the violin?
- How good is your posture; are you still looking for a better setup?
- How is your intonation; are you able to play in tune?
- Do you clench the neck of the violin when playing?
- Are you completely comfortable with your left hand; does your left hand get tired when playing?
If you were able to answer these questions, and you honestly feel that you are ready to start learning vibrato, let’s move to its essential elements and fundamentals.
Before you start learning vibrato on violin, let's shortly check.
- You know 1st position and all the notes in this position.
- You also can play in 3rd position
- You are familiar with shifting, its basics, and your shifting is smooth, light, and flexible; your left-hand wrist is soft and floppy when you shift.
- Your posture is good and you are satisfied with it, you have no ongoing issues with tension when playing the violin.
- You are pretty much comfortable when holding the violin, and your left-hand is loose and relaxed when you play.
- You don’t get tired when playing, and you do not clench the neck of the violin with thumb and first fingers.
Let's move on to the fundamentals: Arm vibrato
Arm vibrato is a slower type of vibrato when we use the arm only. It is broader and deeper. We usually use arm vibrato when playing lyrical music, sad pieces, or moments in music that carry more meaning. It is hard to achieve enough speed with only arm vibrato, but it definitely rewards us with warmness and color.
Let's start practicing arm vibrato step-by-step:
Preparing to practice: relaxing your left hand
Step 1:Relax your left hand, wrist, and fingers; position your left hand as if you were playing the instrument.
Step 2: Make sure your left-hand elbow is loose and hanging down; the upper arm of the left hand should be completely relaxed and free; feel the weight of your arm.
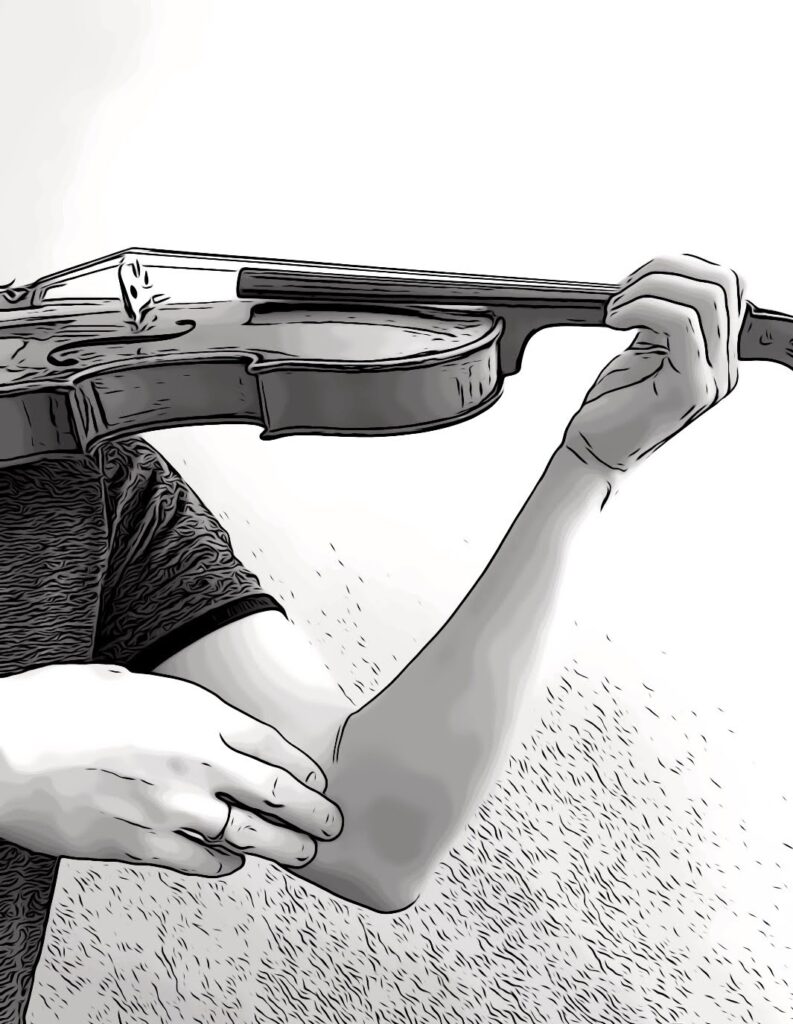
Step 3: While holding the violin, reach over and touch or push your left elbow with your right hand. Your elbow should be loose enough that it bounces back and returns to its vertical position as before, completely free and relaxed.
Your left hand remains relaxed and hanging, in a vertical position.
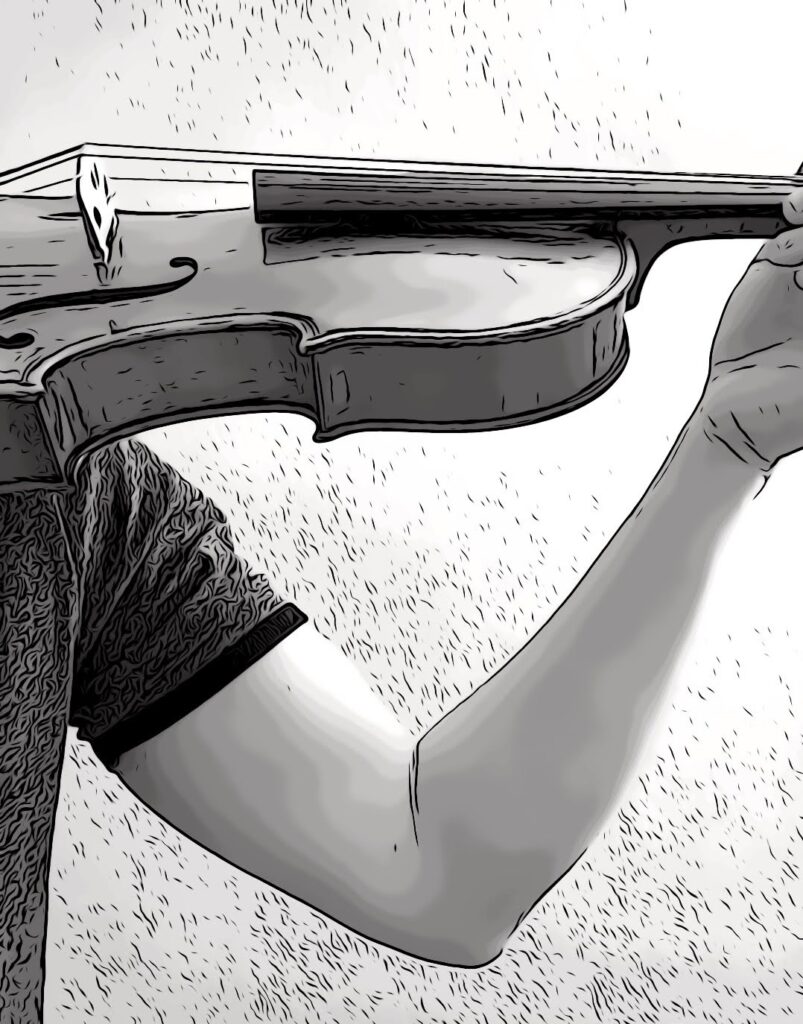
Push your left elbow and make sure it is relaxed. It should bounce back.
Understanding the direction
Step 1: Start slowly moving your left hand up and down the fingerboard as if you were shifting from 1st to 3rd position. Don’t place your fingers on the strings yet because for now we just want to feel the motion of the left hand. Keep your wrist relaxed and floppy.
The base knuckle of the first finger can lightly touch the neck allowing us to move the hand up and down the fingerboard without any resistance.
After you feel comfortable sliding up and down the neck, now place your fingers in 1st position and slide up to 3rd position and back. Keep everything relaxed and free.
Spend at least three minutes practicing this.
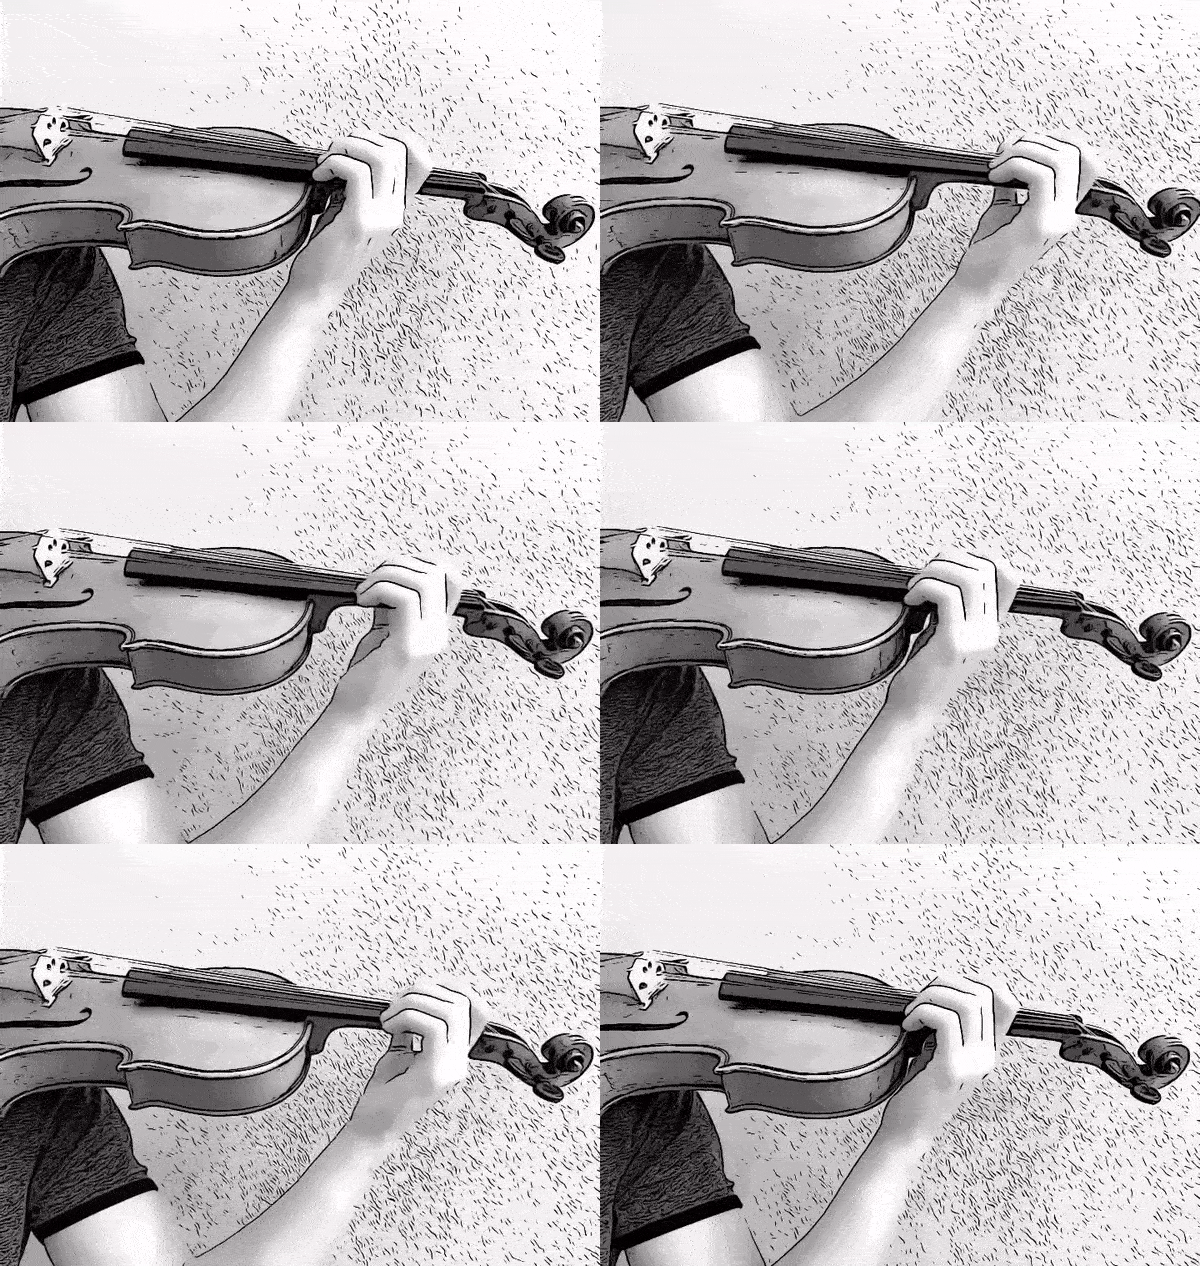
Preparatory exercise for arm vibrato
A good preparatory exercise for arm vibrato. Start moving it slowly and evenly. Take a break when your arm feels tired. Increase tempo gradually. Always remember to keep your elbow relaxed
Arm vibrato in motion
Step 2:
In arm vibrato, the impulse always comes from the forearm. The wrist is straight and moves as one with the forearm. With this in mind, put your middle finger on any string. Push down and gradually apply more pressure to the string so that it cannot move or slide against the fingerboard. Now, instead of sliding your hand up or down, keep the tip of your finger pressed down on the string and fixed in place, while the forearm moves back and forth and the top knuckle of the finger wiggles or flexes on the string, causing the pitch of the note to change. This sound and movement of the finger on the string is called vibrato. Once you have mastered basic movement of the arm and finger, Increase the speed incrementally in one, two, and four counts per second. Continuously check on your wrist and elbow ( upper arm), making sure they stay relaxed.
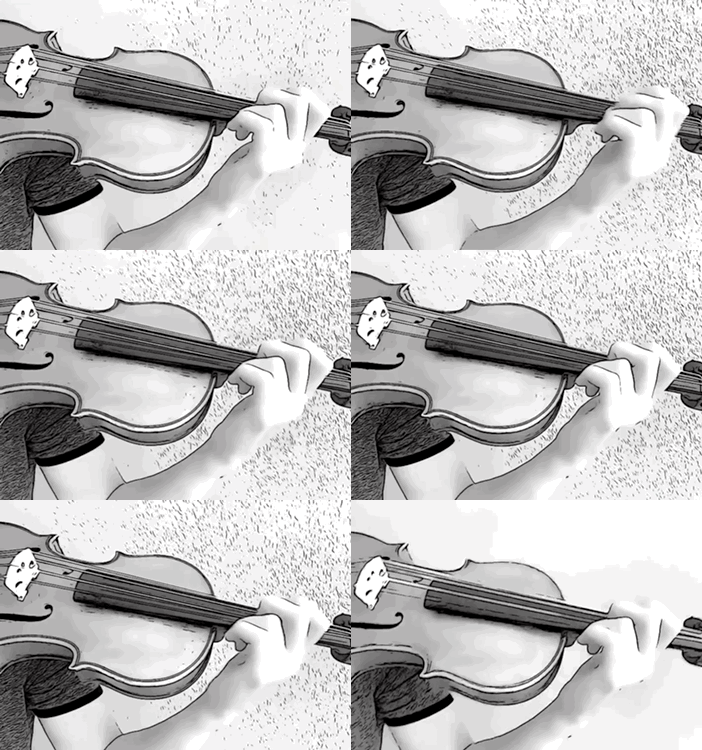
Once you’ve practiced this for at least one week and your knuckles bend evenly and in tempo, you can start playing a very easy and slow melody with a slow vibrato. You can start playing a part of a scale or just any notes and connect them with continuous vibrato. When you start feeling more confident and your vibrato is even and continuous, you can increase the speed which will reduce the distance of the finger movement.
Wrist vibrato
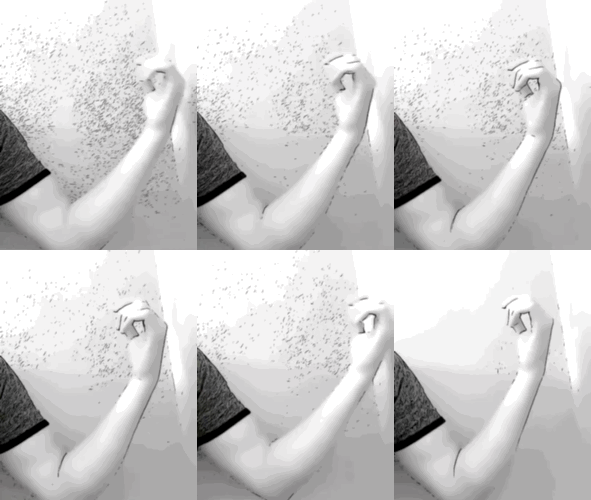
Wrist vibrato is the most common type of vibrato that is used almost everywhere. It can be much faster and more intense than arm vibrato. It can also be played slower but not as slow as arm vibrato. With wrist vibrato, we have to understand that all parts of the left hand work together. We cannot have a good wrist vibrato if our hand is too tense; the hand should be loose, relaxed and freed, with the initial impulse for movement coming from the wrist.
Start wrist vibrato training with this preparatory exercise, done without the violin. Remember to move your wrist evenly and make sure it is not getting tense. Take a break after you notice that the movement loses its evenness. Whenever you push your wrist forward it should bounce back almost by itself.
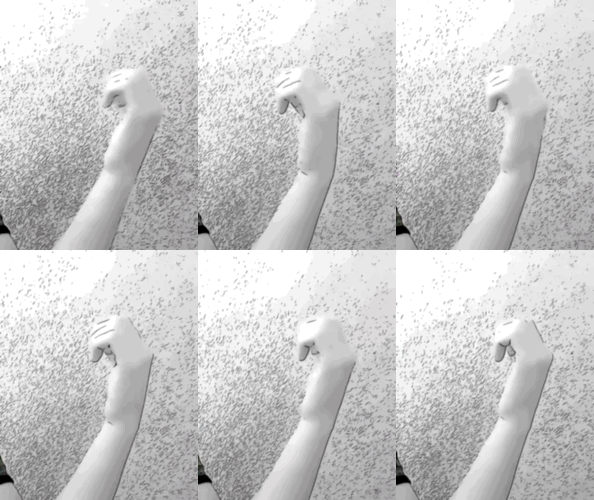
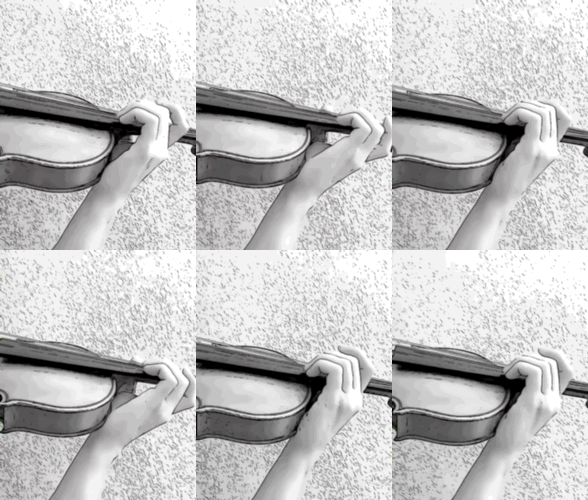
Wrist vibrato in 3rd position
After a few weeks of practice, you can go to 3rd position and start sliding your finger by moving your wrist back and forth to the original position. Practice this in tempo. You want to start slow and increase the speed gradually. You can do this exercise in intervals starting with 1 second per movement; then 1 second per two movements; then 1 second per 4 movements. Continue practicing this daily with patience. Take it slowly and spend at least 5-10 minutes a day. Soon, your hand and muscles will get used to vibrato and you will feel more confident doing it.
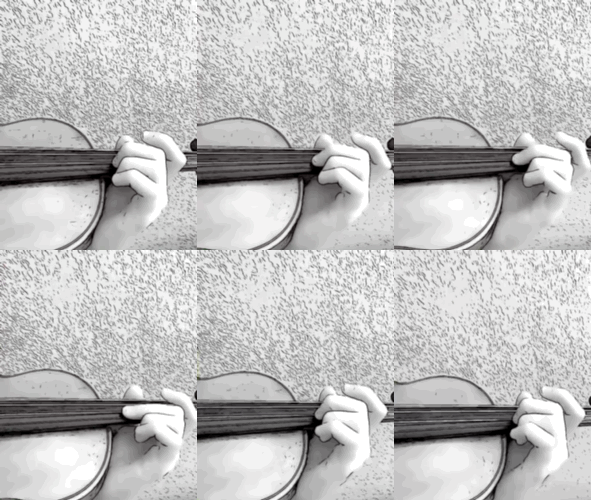
Wrist vibrato: moving the knuckle
Put your middle finger on A string in 3rd position and start applying more pressure so it gradually stops sliding. As we did with arm vibrato, the knuckle of your finger will flex on the string, causing the pitch to change. Start on the pitch and then return to the original pitch. Keep your wrist and hand relaxed. You will have to practice this slowly and spend considerable time on it. Increase your speed gradually as before.
Note that when moving back from 3rd to 1st position, you have to make sure that the left hand stays relaxed and the wrist motion is not interrupted by squeezing the neck or tensing up the upper arm. Any kind of tension in the left hand, wrist, or arm can prevent a healthy vibrato.
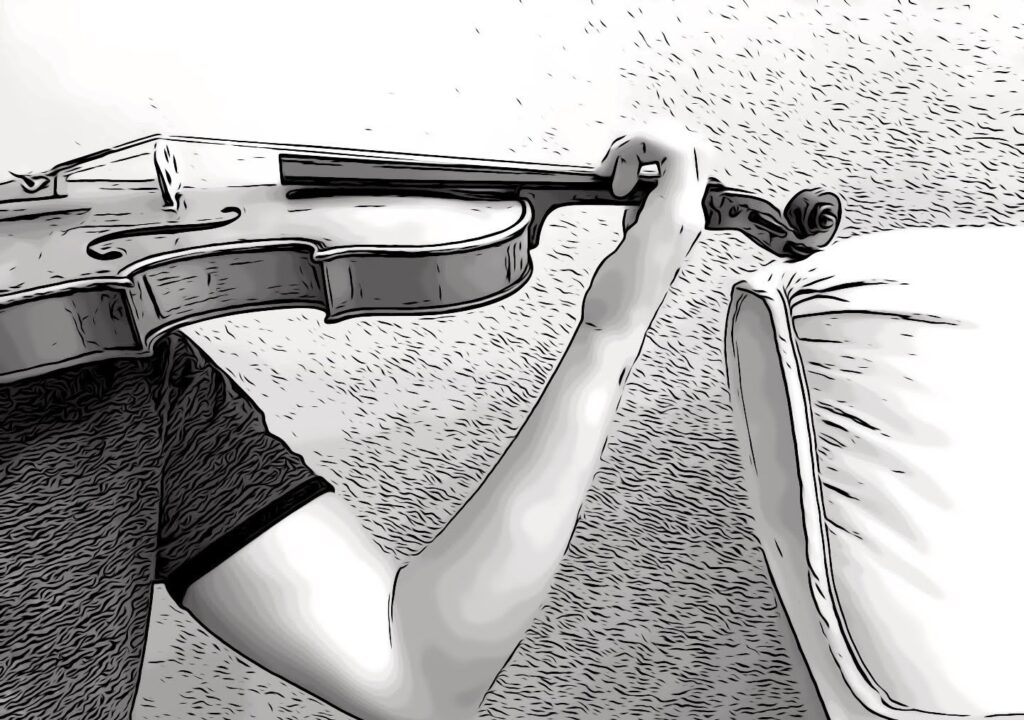
Using hard support for your left hand
You can use hard support (a table or chair to take the weight of the neck away from your hand) for the violin when practicing wrist vibrato in 1st or 2nd positions. Your hand will rest and allow you to feel the freedom of movement.
Using the couch as hard support while practicing vibrato
Types of vibrato: arm, wrist, combination of both, and knuckle vibrato
There are three main types of vibrato: arm vibrato, wrist vibrato, and finger or knuckle vibrato. Also, there is a combination of arm and wrist vibrato but I wouldn’t count them as a separate type of vibrato because it is a derivative of both.
A combination of both types
Often we combine arm and wrist types of vibrato and sometimes, it’s even hard to define which type of vibrato we use because we can change it even unconsciously and very often depending on musical choices we make while playing. It allows us to be flexible and expressive.
Finger vibrato
Finger vibrato usually happens in higher positions where wrist vibrato can be hard to use. In this case, the top finger knuckles flex back and forth more actively. It is not easy to achieve therefore finger vibrato is mostly used by professionals.
Tips for vibrato
- Keep your wrist straight. Think of it as an extension of your forearm. Do not bend or collapse it towards the neck of the violin.
- Find hard support for the violin. You can put the violin’s scroll on something soft in front of your eyes while holding the instrument and practice vibrato. It will allow you to relax your left hand more, be more conscious, and improve the productivity of your exercises.
- Remember that while practicing vibrato we start on the pitch, extend the top knuckle downward, and then return to the original pitch.
- Use hard support for arm and wrist types of vibrato when you start learning it.
How to hold a violin bow for beginners- read here
I would love to answer any questions related to violin lessons and violin playing. You can email me at [email protected] or book your free trial lesson here.
Internationally trained violinist Vlad Evstafiev holds a Master in Music diploma from Glenn Korff School of Music where he was accepted as a Graduate Teaching assistant studying with David Neely, a former student of esteemed Joseph Gingold.Vlad served as a concertmaster of UNL Symphony Orchestra in 2015-2017.
Vlad also holds a Performer Diploma in violin performance from Indiana University, Jacobs School of Music, where he studied with a member of Grammy awarded Pacifica Quartet, Austin Hartmann.
Vlad, originally from Ukraine, received his first Masters of Music diploma in Moscow, Russia, studying with Prof. Golovina, a former student of both, Leonid Kogan and Yuri Yankelevich. He worked professionally with many orchestras including The Bolshoi Theatre and Moscow Central Philharmonic Orchestra under Yuri Simonov. In 2010, Vlad was invited to join San Luis Potosi Symphony Orchestra in Mexico, where he played with them for four years as the assistant principal of second violins as well as in a professional string quartet. At the same time, Vlad worked as a violin teacher at the State of San Luis Potosi School of Music and taught privately as well. Throughout his career, he has had great opportunities to work with such amazing, internationally recognized well-known artists as: Yuri Simonov, Maxim Vengerov, Anton Miller, Ben Folds, Leila Josefowicz, Midori Goto, Joshua Bell, Gil Shaham, Pinchas Zukerman among others

